Make your own battery charger with ease
Here is presented a simple manual tool battery charger that can be reliable enough to charge its own battery or car battery in a motor home .
The circuit is not complicated and can be made by anyone even though the new electronic learning .
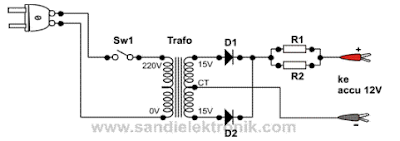
The series consists of three main components, namely transformers, diodes , and resistors . The output is two wires to + ( plus / positive ) and - ( minus / negative ) with crocodile claw end equipped to be used for battery electrodes clipped to the terminal
Note that this circuit is actually a power- supply with full-wave rectification , but without grading capacitors ( smoothing condensator ) .
The voltage produced by the two rectifier diodes are shaped positive pulses with ruffle voltage ( ripple voltage ) is quite large .
If the voltage rectification results were used for the supply - voltage electronic circuits such as audio amplifiers , oscillators or others certainly can not be because of the wrinkles voltage available . However voltage rectification results here would be used to simply download the battery charger , then this is not why because in the case of charging batteries or accumulators are not required DC voltage that is really flat ( free of wrinkles voltage ) .
Resistors R1 and R2 are arranged parallel to obtain a larger power capabilities . Both of these resistors will limit the charging current . Without these two resistors is feared occur with excessive current charging all of which will be burdened fully to the transformer so that the transformer will be easily damaged . Aki can have over charging
R1 and R2 can be scaled down again add tremendous value for the charging current , but we recommend that both resistors have the same resistance value . Both of these resistors will get hot, it's worth the resistor body affixed to a metal box charger or given special aluminum heatsink .
In the state of the charging process is running , occasionally check the voltage available at the resistor with 10V DC voltmeter scale , it will be known how much charging current ongoing . The charging current is there for :
I = V / R
Where I is the charging current (in Ampere ) , V is the voltage measured across the resistor ( in the Volt ) and R is the great resistance of the resistor ( in ohms ) .
If the charging current is too large , it is feared could quickly damage the battery or transformer . If this happens, stop charging and find out what causes it. The most common cause is the battery that is damaged.
BEFORE charging the battery , ensure that the ITU aki aki It 's not corrupt , that already can not -charge Again.
Because this tool is a tool charger manual ( not automatic ) , it is necessary to check periodically when to charge the battery , whether the battery is full or not . The trick is to unplug one alligator claws of the battery , and then measure the battery voltage .
When the battery voltage has reached 13V then it means the battery is fully charged .
List of components :
Transformer : 5A / 2x15V CT ( for car batteries ) , 3A / 2x15V CT ( for motorcycle batteries ) .
D1 , D2 = diode 6A ( for car batteries ) , diodes 3A ( for motorcycle batteries ) .
Sw1 = on-off switch
R1 , R2 = 3.3 Ohm / 20W ( for car batteries ) , 4.7 Ohm / 15W ( for motorcycle batteries ) .
Alligator claws one pair .


Tidak ada komentar:
Posting Komentar