Tampilkan postingan dengan label electric. Tampilkan semua postingan
Tampilkan postingan dengan label electric. Tampilkan semua postingan
Rabu, 29 Juni 2016
the function of the electronic capacitors
02.21
Capacitors in electronic component function is as a store of electric charge , in addition to functioning as a store of electricity , capacitors can also be used as a frequency filter . In the electrical charge storage capacity abilities are called Farad capacitor with the symbol " F " . The symbol of the capacitor itself is C (capacitors ) .
In general , many capacitors are made of two metal plates which are parallel to one another . And there was between the two slabs of insulation materials which we call the dielectric .

In the world of electronics , the capacitor is often referred to as the condenser. The shape and size of the capacitor also varies , we can differentiate by capacity , working voltage and so forth . Capacitors are divided into two groups , namely capacitors that have a fixed capacity and capacitors that have the capacity can be capricious or so-called variable capacitor .
The nature of the capacitor is the ability to store electrical charges , can not flow through the DC ( Direct Current ) , can flow through the AC ( Alternating Current ) and also as the impedance ( resistance value depends on the frequency that is given by the source) .

Thus , the capacitor will be able to generate rektif a circuit .
Sabtu, 25 Juni 2016
How AC service are not cold in their own homes
15.45
How AC service are not cold in their own homes
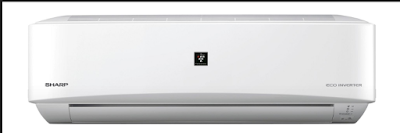
How will I fix the air conditioner does not cool or less cold in your house? My tutorial this time specifically for AC branded SHARP , AC sharp because this model is easier to open when compared with other brands ( does not require special skills ) from daring to try it can. and the problem is not cold because the gross indoor.
Any cause of AC is not cold ? there are many contributing factors like because DIRTY . can in indoor or outdoor.
2. then turn on the AC and feel the wind blowing ! if the ac dirty hembusanya be slow and his voice can not be smoothly anginya also usually no noise kayak mbrebet GTU .
You can see a video tutorial on how to clean
4. The next check is in the out door, the wind that came out to be hot and hembusanya too fast , the higher the ac pk will be higher the anginya gusts .
if the out door dirty then blowing anginya not tight . This will cause the compressor works of life and death because of overload is too hot .
try to wash by spraying water on the condenser ( the pipe through which the wind grating )
and not sprayed on the cover body .
6. but if the effluent does not come out at all it could be because :

How will I fix the air conditioner does not cool or less cold in your house? My tutorial this time specifically for AC branded SHARP , AC sharp because this model is easier to open when compared with other brands ( does not require special skills ) from daring to try it can. and the problem is not cold because the gross indoor.
Any cause of AC is not cold ? there are many contributing factors like because DIRTY . can in indoor or outdoor.
1. Make sure the remote ac are at the correct setting . for example in the COOL mode set but you chose a temperature of 30 degrees of course AC could not cool , or you pressed the wrong course FAN mode AC could not cool . which really is a select set COOL mode (symbol in the remote such as the sun ) and put it at a temperature below 25 degrees ( depending on the outside temperature and the room you need ) small bushes will be getting colder .
3. AC on half an hour after you try to look at the water pembuanagn that are behind its indoor wall ! if there is water out and smoothly means gas freon in ac you most likely still be normal ( to determine the exact measuring devices must use manifold )
5. after the spray you have to feel the difference the wind of before in the spray . if it makes no difference , it means there is damage to the capacitor fan , usually micro farrad its value decreases causing rotation ( rpm ) of the fan decreases .
you can change it by opening the cover and a small black box shaped object with the literature of 1.5 mf .
- Soak compressor capacitor that causes the compressor does not spin
- No freon leak could on its own connection or unit
- or the compressor itself was broken , on winding or mechanicals
- The indoor module does not give orders that are not flame out door
Make your own battery charger with ease
04.18
Make your own battery charger with ease
Here is presented a simple manual tool battery charger that can be reliable enough to charge its own battery or car battery in a motor home .
The circuit is not complicated and can be made by anyone even though the new electronic learning .
The series consists of three main components, namely transformers, diodes , and resistors . The output is two wires to + ( plus / positive ) and - ( minus / negative ) with crocodile claw end equipped to be used for battery electrodes clipped to the terminal
Note that this circuit is actually a power- supply with full-wave rectification , but without grading capacitors ( smoothing condensator ) .
The voltage produced by the two rectifier diodes are shaped positive pulses with ruffle voltage ( ripple voltage ) is quite large .

If the voltage rectification results were used for the supply - voltage electronic circuits such as audio amplifiers , oscillators or others certainly can not be because of the wrinkles voltage available . However voltage rectification results here would be used to simply download the battery charger , then this is not why because in the case of charging batteries or accumulators are not required DC voltage that is really flat ( free of wrinkles voltage ) .
Resistors R1 and R2 are arranged parallel to obtain a larger power capabilities . Both of these resistors will limit the charging current . Without these two resistors is feared occur with excessive current charging all of which will be burdened fully to the transformer so that the transformer will be easily damaged . Aki can have over charging
R1 and R2 can be scaled down again add tremendous value for the charging current , but we recommend that both resistors have the same resistance value . Both of these resistors will get hot, it's worth the resistor body affixed to a metal box charger or given special aluminum heatsink .
In the state of the charging process is running , occasionally check the voltage available at the resistor with 10V DC voltmeter scale , it will be known how much charging current ongoing . The charging current is there for :
I = V / R
Where I is the charging current (in Ampere ) , V is the voltage measured across the resistor ( in the Volt ) and R is the great resistance of the resistor ( in ohms ) .
If the charging current is too large , it is feared could quickly damage the battery or transformer . If this happens, stop charging and find out what causes it. The most common cause is the battery that is damaged.
BEFORE charging the battery , ensure that the ITU aki aki It 's not corrupt , that already can not -charge Again.
Because this tool is a tool charger manual ( not automatic ) , it is necessary to check periodically when to charge the battery , whether the battery is full or not . The trick is to unplug one alligator claws of the battery , and then measure the battery voltage .
When the battery voltage has reached 13V then it means the battery is fully charged .
List of components :
Transformer : 5A / 2x15V CT ( for car batteries ) , 3A / 2x15V CT ( for motorcycle batteries ) .
D1 , D2 = diode 6A ( for car batteries ) , diodes 3A ( for motorcycle batteries ) .
Sw1 = on-off switch
R1 , R2 = 3.3 Ohm / 20W ( for car batteries ) , 4.7 Ohm / 15W ( for motorcycle batteries ) .
Alligator claws one pair .
making mini electric generator easiest
04.05
making mini electric generator easiest
mini generator is a power plant that produces electricity that is small and only enough to light LED or other small lights.
In general, using the mini generator power as a magnet repel pengerak turbinya so do not require enegri or fuel to turn turbines , curious mini generators without fuel ? let's discuss together .
Generally magnet has two poles , namely the north and south which repel each other when brought near the north pole to the north pole as well as the south pole will repel each other when dedekatkan the south pole .
1. First off the fin fan as shown below
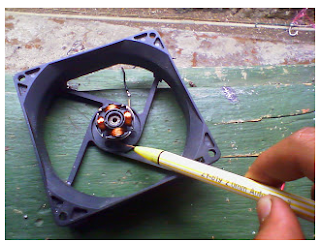
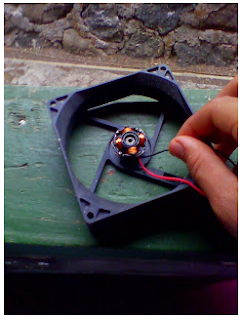
3. Thirdly we wrap wire which we prepared earlier with the pen , we remove the cartridge and then we email the wire input into the pen for more details as shown above.
5. magnet toy or decoration fridge magnet we attach fins to fan the north pole position mengahadap to top or vice versa clear lest among the magnets that we put there facing the opposite direction of the core should all
7. Then we test whether the mini generator we can spin the magnet neodinium encouraged by the way we bring the north pole of the magnet set in fin fan .
9. Large voltage we produce is of the coils that we created and magnetism lies behind the fin fan
mini generator is a power plant that produces electricity that is small and only enough to light LED or other small lights.
In general, using the mini generator power as a magnet repel pengerak turbinya so do not require enegri or fuel to turn turbines , curious mini generators without fuel ? let's discuss together .
As we all know that electricity can be created with a wire coil email by a magnetic field in a way mengerakan bar magnet itself as the title of the discussion is to make mini generators without fuel and energy then we cati know how mengerakan bar magnet without having touch it , the more curious is not it?
of the magnetic properties can be utilized as pengerak bar magnet that we will make a mini generator . For ingredients that must be prepared are :
• The fan dc / ac
• Wire email
• Magnet toy / ornament refrigerator
• Magnet neodinium
• Glue
• Cables
manufacturing steps are as follows :

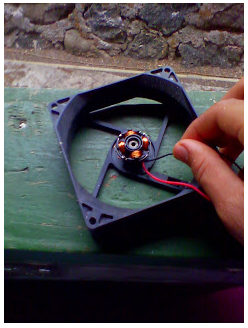
2. If it is off , now we loose wire windings emails in raangkaian slowly and not to damage the home or place of windings
4. if one pole we give 150 coil windings , the poles that another party must also be 150 windings at this stage requires extra
6. Then we put back fin fan with a stand or original place
8. Finally the voltage test of his guys with a way to connect the cable end with LED lights or regular lights if lit you have succeeded and if it is not lit should not be disappointed once we make sure first that the mini generator we produce electricity by using multitester .
10. And if mini generator does not turn on when the fin fans spin then wrap back windings us with the amount of twist more and if necessary replace the circular magnet in the fin fan with magnetic strength is better than the already installed
HOW TO CORRECT Wired / MIC / MICROPHONE /
03.22

There are two kinds of connections that a microphone Microphones by taking the cable and microphone without wires or Wireles . A microphone that will be discussed this time is a microphone cable . there was some damage / complaints are often found in these types of microphones including :
- No sound at all or totally dead.
- Sometimes flame sometimes die , lights up when the cord digerak movement or bent .
- When being held noisy sound like the voice of a rat coming out of the speaker / speaker
Before starting to improve it is good we first prepare supporting equipment , namely :
- Phillips screwdriver small size
- AVO meter
- Lead
- Alligator pliers / pliers monyong .
- Cutter knife .
- solder
This type of damage and how to fix it
NO SOUND ON / OFF TOTAL
The causes can vary from winding mik break, breaking the connecting cable connector into the mic until the cable winding miknya dropouts , therefore memperbaikinyapun must be sorted one persatu.mulailah with :
- Unplugging the microphone from the cord, then replace it with another mic cable is still good,
- When the mic is not working (not out sound from the loudspeakers) means miknya damaged
- To fix try to open mic connector that is in the mic stem by loosening the small screw that is on the outside of the mic
- Then slowly pull the connector, be careful when removing the connector cable is very short because, when you are in a hurry then the cord will break.
- Check cables from the start connector to the coil / spool is well connected, if still connected to both the next step is
- Measuring connectors 1 and 2 use AVO meter RX1,
- When the AVO meter needle does not move the coil / mic broke spull replace with new ones.
- When the mic works fine means the cord is damaged.
- To fix the microphone cable from the jack mic check, mic cable, to jack 1/4 "may be among the three components that are broken. To measure the cable try using AVO meter RX1, when the needle AVO meter mic cord broke the silence and when the needle AVO meter moves to zero and silent then the cable is still in good condition.

SOMETIMES SOMETIMES IS ILLUMINATED OFF ( ILLUMINATE WHEN OR cord moved about bent )
Usually these symptoms are due to a failure mic cables or connectors but the distance both ends of the severed close therefore the mic sometimes flame sometimes die when moved. how to fix it follow the steps in point 1. Special to the mic cord damage ( break) on the part of the cable which lights up when the cable bebengkokkan life , peel and discard the cord is decided.
MIC is being held OUT WHEN NOISY SOUND SOUND LIKE RATS OF SOUND hARDENER
Complaints like this are very common , due to the disruption of input / positive ( the line was flowing at the end of the fourth janck " , the center of the mic cable , pin / socket or connector terminal no.2 mic ) . To fix it follow the steps in point 1 .
Langganan:
Postingan (Atom)